What is Granular Synthesis?
Granular synthesis is a method in which an audio sample is cut into smaller equal ‘grains,’ and these grains are used to create new audio data – this is called granulation and the sequences of grains is called a graintable. These grains are usually up to 100ms in length for the synthesis application, though there is no reason to not use techniques with larger grains for different effects. The grains are played back with an envelope to determine the texture of the sound; a small attack and release is usually needed anyway to avoid clicking, but increasing these also allows the grains to blend together more for more pad-like sounds.
These techniques can also be used to pitch-shift and time-stretch samples independently of each other. Slowing down the playback of a sample usually results in lowering the pitch as well, but granular synthesis can bypass this by repeating playback or removing grains. If you played back the graintable but played each grain twice instead of once, you are making the sample longer and this is a time-stretched file – if you slow down a file too much you will be able to hear this repetition of grains. Conversely, removing periodic grains shortens the file length and this is also a time-stretched file. Each grain can be pitch-shifted independently, which allows a sample to be pitched up or down without time-stretching. If your DAW allows you to pitch and stretch audio independently of each other, it’s using granulation to do so.
Basic Granular Synthesis
The most basic form of granular synthesis can be achieved simply by using a looper. If the size of the loop is small enough, you have created a single grain. You can see in this example how this can be done. Using just the Ableton Live Looper, a single grain can be selected by reducing the length of the loop, whilst moving the start point of the loop allows you to scan for the grain you want to use.

Adjusting the attack and release of the looper gives you some control of the grain envelope, and allows you to blend the sound as much as you want. With lower values, you will get more of a stutter effect, whilst high values blend the sound more and it becomes more like a pad sound. For this reason, the snap option has been disabled as adjusting the envelope will reduce clicks. This method is essentially the same result as time-stretching a file too much; you can hear the individual grain being repeated.
Getting More Complex
The basic synthesis technique is very limited in what it is able to accomplish for a number of reasons: there is no control over grain parameters, the grain itself is looped within the plugin and cannot be changed without automation, and there is only a single voice. Dedicated granular plugins will allow multiple voices, so you can have grains overlapping on top of each other to create a much more unique sound than a single voice loop. Adding more voices creates a denser grain cloud, and therefore a much more varied and textured sound.
Using the free Max for Live plugin Granulator II will open up the options as this is a dedicated granular synthesis plugin. Some of the parameters here will be doing similar functions as the looper, but with more controllable and customisable results. Granular synthesisers are generally MIDI instruments, so you will need to have MIDI notes playing in order to hear your results.
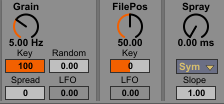
The first two modules control basic parameters: grain length and start point, just like the Looper version. The Spray control adds a time variance to each individual grain, which means that they won’t all be starting at the same time. A small value means the grains will be starting very close to each other, but this is enough to add some texture to a sound that would otherwise be static. A high value could mean the grains start anywhere in the audio sample (depending on its length) which can start to border on glitch territory. This means you can use granular plugins to create generative glitch if you set up the parameters in certain ways.
Granulator II is a great place to start with granular synthesis as it has a visualiser of the audio file built-in, with markers for the grains being played back. This means you can see your grain cloud in real-time and adjust parameters based on what you are seeing. It’s a good way of learning exactly how controls are affecting the playback of grains.

One of the things that makes granular synthesis so interesting is the variance in parameters, as this is what creates the evolution within the sound. This variance is less controllable though, so there is some randomness inherent to making sounds this way. It’s important to understand the basic concepts so that you can push the sound in the direction you want, and to work out what you might be able to change in order to get more desirable results.
That being said, every granular synthesiser works differently outside of the very basic parameters of grain size, start point of playback, and the ability to vary the start point for texturing. Other common parameters will be adjusting the speed of the grains (including negative speed for reversing), the pitch of the grains, pan controls for spreading the sound around the stereo image, and LFOs that you can send existing controls to for even more variance.
Just like any instrument, every granular synthesiser has its own advantages and drawbacks, so it’s not uncommon to find people using a variety of plugins to achieve different results. If you are new to granular synthesis, then playing around with freeware plugins to get more of an understanding is the best way to go, and when you get more comfortable then you might consider paying for more complex synths.
To wrap up, check out some of our favourite Granular plugins: